


Product Details
- This product is a low-voltage SPI controller, the standard product supply voltage is 12-24V;
- With 4 in 1 function, compatible with single color/CCT/RGB/RGBW digital LED strips.
3. Four groups of SPI signal output ports which can control up to 2048 pixels each port;
4. With digital tube and control buttons, it can also be used with RF remote control for mode selection, speed and IC point adjustment;
5. With power-off memory storage function;
6. There has 29 effect modes for single color, the 28th mode is automatic loop mode and the 29th mode is custom combination mode;
7. There has 54 effect modes for CCT, the 53rd mode is automatic loop mode and the 54th mode is custom combination mode;
8. There has 136 effect modes for RGB/RGBW, the 135th mode is automatic loop mode and the 136th mode is custom combination mode;
9. The controllers can realize multiple synchronous changes through shielded wire connection;
10. 3 years warranty, excluding man-made damage, improper operation, overload short circuit or force majeure factors.
Technical Parameters:
| Working temperature | 0-45℃ | Working voltage | DC12-24V |
| Static consumption | <1W | RF frequency | 2.4GHz |
| Gray level | 256 | Speed level | 99 |
| N. weight | 100g | G. weight | 130g |
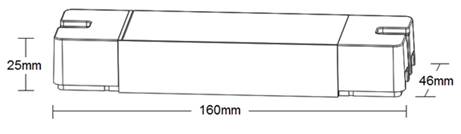
| Dimension | L160*W46*H25 mm | Packing size | L170*W50*H29 mm |
| Output signal | 4 groups | Max. IC points | 2048 |
| RF distance | ≤20m | Modes | Single color: 29; CCT: 54; RGB/RGBW:136 |
| Memory function | Yes | Wired-Sync | Yes |
| Compatible ICs |
Single color/CCT/RGB: UCS1903、WS2811、WS2812、WS2813、WS2815、WS2818、TM1804、TM1809、TM1812、SM16703、ICP943、17822、SK6812、SK6813. Single color/CCT/RGBW: UCS2904B、SM16704、SK6812、FW1834. |
||
Remote control:
| LED type | Remote control | |
|
Single color/CCT (2 in 1 remote control) |
 |
 |
| RFBT03B (1-zone) | RFBK-DIMCCT-2.4G (4-zone) | |
|
RGB/RGBW (2 in 1 remote control) |
 |
 |
| RFBT03A (1-zone) | RFBK-RGB-2.4G (4-zone) | |
Dimension
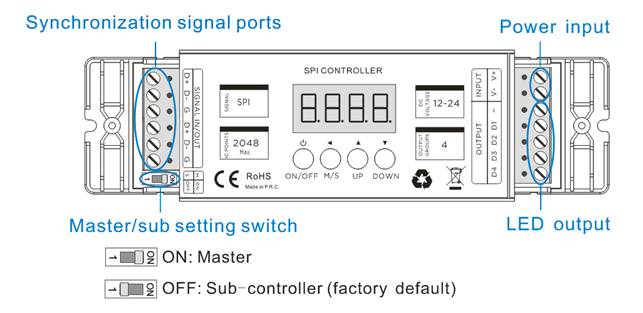
Connection ports
Instructions for use
- Determine the controller is the master or the sub-controller, and set the DIP switch at the right position, master-ON, sub-controller- OFF;
- Connecting the load led strip at first, then connect the power input wires; and make sure that there is no short circuit between the connecting wires before powering on;
- The functions of the 4 buttons on the controller are as follows:
| Button | Function description |
| ON/OFF | Turn on/off |
| M/S |
Switch Mode/speed/brightness adjustment functions Mode adjustment: digital tube display H*** (*** is 000-029/000-054/000-136, 000 is displayed when controlled by the touch ring on the remote control) Speed adjustment: the digital tube displays S-** (*** is 01-99), the speed adjustment function is only valid for dynamic mode Brightness adjustment: the digital tube displays d*** (*** is 001-100), the brightness adjustment function is only valid for static mode |
| UP | Mode+/Speed+/Brightness+, adjust the object according to the setting result of M/S. |
| DOWN | Mode-/Speed-/Brightness-, adjust the object according to the setting result of M/S. |
- Control IC number setting
In the off state (the controller needs to be powered on), long-press the “UP” and “DOWN” keys at the same time for two seconds, the digital tube displays **** (0010-2048, the current IC point number ),means enter the IC number setting interface , Press “UP”/ “DOWN” to increase/reduce the control IC number.
After the setting is completed, press the “ON/OFF” key to save and exit.
- Load LED type and LED colors sequence setting
There are a wide variety of digital LED strips in current. This item not only supports the setting of output LED types but also allows for the setting of the color sequence of different LEDs.
Output LED types setting
In the OFF state (need be powered on), press the “UP” and “DOWN” buttons simultaneously for two seconds. After the controller enters the IC number setting interface;
Then press the “M/S” button once to enter the setting of output modes for single color —1 / CCT — 2 / RGB — 3 / RGBW — 4. You can switch the output modes by using the “UP” and “DOWN” buttons.
LED colors sequence setting
After selecting the output LED type, press the “M/S” key again to enter the setting for LED colors sequence. You can switch by using the “UP” and “DOWN” keys.
| Output LED type | LED colors sequence setting | ||||||||
| LED type | Display | Channels and sequence(digital tube display) | Marks | ||||||
| Single color | —1 | 1 CH | dI | ||||||
| Correct setting indication: The load LED strip will be in a fully lit state. | |||||||||
| CCT | —2 | 2 CHs | ct | tc | |||||
| 3 CHs | ct- | tc- | c-t | t-c | -ct | -tc | “-” stands for blank | ||
| Correct setting indication: The CCT LED strip will light up in sequence according to the order of “cool white – warm white – off” as a whole. | |||||||||
| RGB | —3 | 3 CHs | rgb | rbg | brg | bgr | grb | gbr | |
| Correct setting indication: The RGB LED strip will light up in sequence according to the order of “red – green – blue – off” as a whole. | |||||||||
| RGBW | —4 | 4 CHs | rgb- | rbg- | brg- | bgr- | grb- | gbr- | “-” stands for W |
| -rgb | -rbg | -brg | -bgr | -grb | -gbr | ||||
| Correct setting indication: The RGBW LED strip will light up in sequence according to the order of “red – green – blue – off” as a whole. | |||||||||
Tips:
- For some models of CCT LED strips, one channel has no function and is only used for occupying a position. The “-” in CCT-3CHs means that this channel is blank (no function).
- The “-” in “RGBW” stands for “W”.
- The factory-default colors sequence for RGB/RGBW mode is rgb.
- There are various types of digital LED strips. When setting up, the “correct setting indication” appears on the load light strip, means that the setting has been matched, and there is no need to check out the specific of the light strip in advance.
- When using the multi-device online synchronization function, please confirm that the load output type and the color sequence settings of all devices are consistent. Otherwise, synchronization abnormalities may occur.
After the setting is completed, press the “ON/OFF” key to save and exit.
- Custom combination mode setting
This mode is a free combination mode. Choosing 2-20 modes combine them into a cyclic mode, and each mode can set an independent change speed.
| LED type | Total modes | DIY mode | Selection range | Function |
| Single color | 29 | The 29th | 2nd -27th | Select 2-20 modes to combine into a custom loop mode, the speed of each selected mode can be adjusted independently. |
| CCT | 54 | The 54th | 4th -52nd | |
| RGB/RGBW | 136 | The 136th | 8th -134th |
Step 1: In the off state, long-press the “M/S” and “Up” buttons at the same time for 2 seconds to enter Custom combination mode settings, the digital tube will light up and display “-**-“, “-**-” represents the currently edited scene number. Please use the “UP” / “DOWN” keys to select the scene number to be edited. For example, we will set a custom combination mode with 5 modes.
Step 2: Setting the mode for -01-. Press “M/S” after Step 1 “-01-“, the digital tube will display “H***”. Please use the “UP” / “DOWN” keys to select the needed mode from “Selection range” for “-01-“. If the digital tube displays “H000”, mean there is no effect was set to current scene.
Step 3: Setting the speed for -01-. Press “M/S” after Step 2, the digital tube will display “S-**”. Please use the “UP” / “DOWN” keys to select the needed speed from 01-99 for “-01-” mode. The status of loading led strips will be changed accordingly.
Press “M/S” after Step 3, the digital tube will display back to “-01-“. Please press “UP” / “DOWN” keys to select the next edited scene number and repeat the operation like step2 and step 3 to finish the all other 5 scenes from 2nd to 6th. And press the “ON/OFF” key to save and exit in the end.
Important notes: When there are less than 20 scenes set, the scene should start from -01- the first number (because the 136th mode runs from scene “01”), and the scenes without effect need to be set to “H000”. Like example that we set 5 scenes to combinate the 136th mode, enter the edit menu and edit the respective modes and speeds of scenes “-01-” to “-05-” (can be not in order during the editing operation). After editing, please check the mode of scene “-06-” should be “H000”, if not, please correct it by the “UP”/”DOWN” keys.
- Synchronization function
The synchronization control function can be formed by connecting up to 32 controllers, all controllers follow the first master control to achieve synchronous changes without delay.
After all the controllers are connected according to the wiring diagram (please make sure the position of the DIP switch of the master and the sub-controller is correct), just turn on the master, and the sub-controllers will change according to the speed and mode of the master. The green signal light on the sub-controller will flash in normal working statues.
Remote control: RFBT03A/RFBT03B
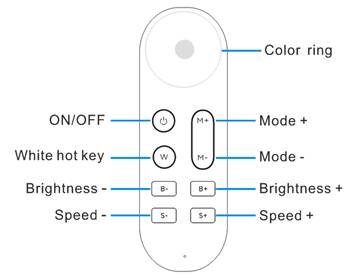
| Button | Function description |
 |
ON/OFF |
| Color ring |
Single color:Static white light, digital tube displays d***, brightness is adjustable by B+/B-. CCT: Static CW-WW light, digital tube displays C***, brightness is adjustable by B+/B-. RGB/RGBW: Static color light, digital tube displays H000, brightness is adjustable by B+/B-. |
| W |
Single color: Static white light hot key, digital tube displays d***, 3 brightness 25%/50%/100% hotkeys. CCT: Static CW-WW light hotkey, digital tube displays H001-H003 (cool white, warm white, pure white). RGB/RGBW: Static white light hot key, digital tube displays H007, brightness is adjustable by B+/B-. |
| M+ | Mode + (Single color: up to 29; CCT: up to 54; RGB/RGBW: up to 136.) |
| M- | Mode – |
| B- | Brightness- for static light, long-pressing can get fast adjustment. |
| B+ | Brightness+ for static light, long-pressing can get fast adjustment. |
| S- | Speed- for dynamic light, long-pressing can get fast adjustment. |
| S+ | Speed+ for dynamic light, long-pressing can get fast adjustment. |
RFBT03A/RFBT03B pairing and clearing setting
| Button | Function | Operation instruction | Marks |
 |
Pairing (ON/OFF key) |
Connect the receiver to the load and power it on. Press and hold the pairing button for 5 seconds. The indicator light on the remote control will flash rapidly. Then you see the load light blink 3 times and return to its initial state, means the code-pairing is successful. | If the receiver has been paired with other remote controls, please do the clearing operation firstly before paring. |
 |
Clearing (W key) |
Within 1 minute after the receiver is powered off and then powered on again, press and hold the clearing key for 5 seconds. The indicator light on the remote control will flash rapidly. Then you see the load light blink 3 times and return to its initial state, means the code-clearing is successful. | The code-clearing operation is only valid within 1 minute after the receiver is powered on. |
Remote control:RFBK-DIMCCT-2.4G/RFBK-RGB-2.4G
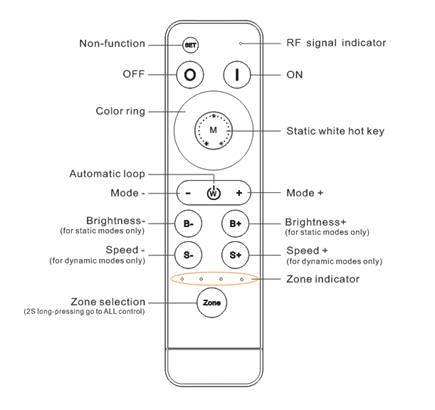
| Button | Function description |
 |
Non-function |
 |
ON |
 |
OFF |
| Color ring |
Single color:Static white light, digital tube displays d***, brightness is adjustable by B+/B-. CCT: Static CW-WW light, digital tube displays C***, brightness is adjustable by B+/B-. RGB/RGBW: Static color light, digital tube displays H000, brightness is adjustable by B+/B-. |
 |
Single color: Static white light hot key, digital tube displays H001, 3 brightness 25%/50%/100% hotkeys. CCT: Static CW-WW light hotkey, digital tube displays H001-H003 (cool white, warm white, pure white). RGB/RGBW: Static white light hot key, digital tube displays H007, brightness is adjustable by B+/B-. |
 |
Automatic loop hotkey, digital tube will display H028(Single color)/H053(CCT)/H135(RGB/RGBW). |
 |
Mode down. Long-press can
Related products
|
Reviews
There are no reviews yet.