


- This product is a constant voltage controller, the standard product power supply voltage 5-24V is a wide voltage, and the power supply in this range can be used universally;
- Output current: 3chs * 5A (RGB), 4chs * 4A (RGBW);
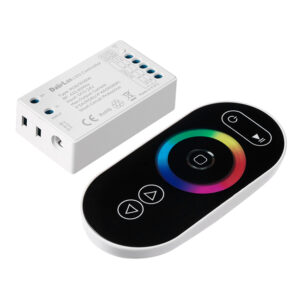
- Adopts RF wireless wall panel remote control, the maximum distance can reach 20 meters;
- Both remote control and receiver are 2 in 1 for RGB and RGBW, one product for 2 types of LED strips;
- Adopts color ring to achieve 64 colors and 10 modes, the brightness of all static color and the speed of the dynamic modes are adjustable.
- Short circuit protection function, power-off memory storage function;
- 3-year warranty.
Technical Parameters
Controller:
| Working temperature | -20-60℃ | Supply voltage | DC5V-24V |
| Static power consumption | <1W | Connecting mode | common anode |
| Grayscale | 1024 levels(RGB each) | Speed stage | 100 grade |
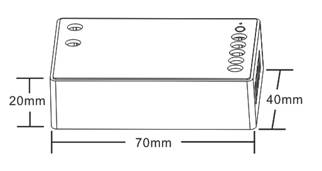
| External dimension | L70*W40*20mm | Packing size | L90*W54*H32 mm |
| Net weight | 45g | Gross weight | 70g |
| Output | 3/4 channels | Max. Output current | 3CH*5A(RGB) / 4CH*4A (RGBW) |
| RF frequency | 433.92Mhz | Remote distance | Up to 20M |
| PWM frequency | 1.95KHz | Memory function | Yes |
| Short-circuit protection | Yes | Max. Output power |
RGB: 75W(5V); 180W(12V); 360W(24V) RGBW: 80W(5V); 192W(12V); 384W(24V) |
| Ambient temperature | 0-45℃ | Working voltage | AC90-265V(50/60Hz) |
| Standby power | 0.2W | Working power | 2W |
| Net weight | 130g | RF frequency | 433.92MHz |
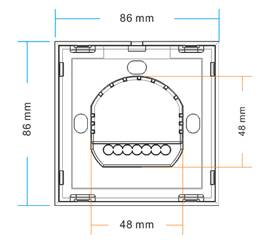
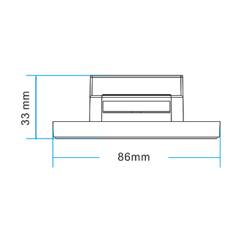
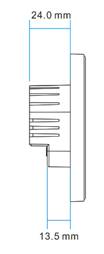
| Dimension | 86*86*34mm | RF distance | ≤20m |
| Structure | 86-type European standard | ||
Dimensions
Controller:
Wall panel remote control:
Interface Specifications
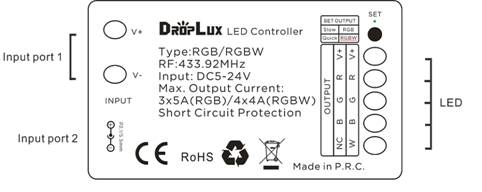
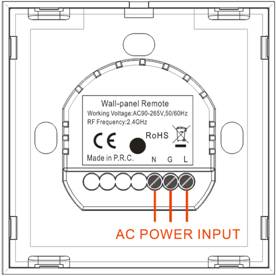
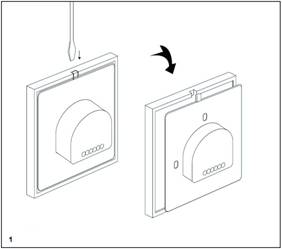
Wall-panel Installation instruction
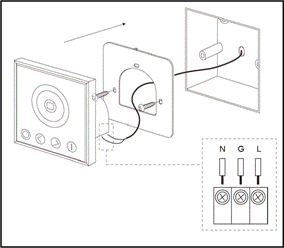
Direction for use
- Connect the load wires at first, followed by the power wires.
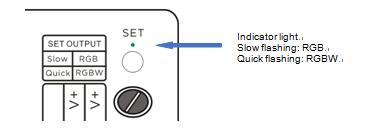
- Use the SET button to set the output type to be consistent with the type of LEDs connected to the load. The indicator flashes slowly: RGB, flashes quickly: RGBW.
- Adopts RF wall panel remote control, with one color ring and 5 function buttons.
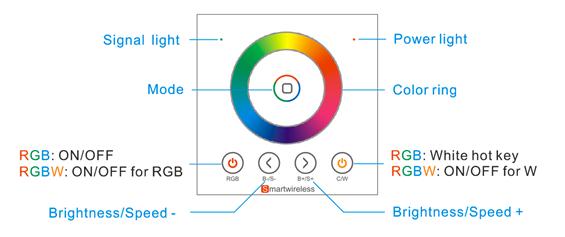
Key functions
| Button | Instruction | Remarks |
 |
RGB channels ON/OFF in any time for both RGB/RGBW type receiver | |
 |
White color hot key for RGB type receiver; W channel ON/OFF for RGBW receiver | |
 |
Color ring for color selection | |
 |
For RGB white and Dynamic modes | 10 modes in total |
 |
Reduce speed/brightness level, long-pressing can get fast adjustment | Speed for dynamic modes, Brightness for static modes. |
 |
Increase speed/brightness level, long-pressing can get fast adjustment |
10 modes in total as below:
| No | Patterns | Remarks |
| 1 | Static white | Brightness is adjustable |
| 2 | White flash | Speed is adjustable, brightness is unadjustable |
| 3 | White breath | |
| 4 | Three-color jump changing | |
| 5 | Seven-color jump changing | |
| 6 | Three-color gradient changing | |
| 7 | Seven-color gradient changing | |
| 8 | R/G cross fade | |
| 9 | R/B cross fade | |
| 10 | G/B cross fade |
RF CODE
Receiver can be controlled by any one the same remote as factory default; remote control delivered with unique RF code as factory default; if unique-control is needed, please matching the code before installation and using.
Matching code operation
Receiver and Remote Control are coded as default, matching them before using, if unique-control or new-coded-remote is needed, pairing the remote and the receiver as below operation instructions before using:
Method 1:
1.Step 1: Pressing key “MODE” and hold on, power on the controller, the load LEDs will be 50% brightness white as responding.
2.Step 2: Pressing “CW” 3times in 3 seconds, corresponding to the operation, the LED’s brightness will change as 25%-10%-back to preset level.
3.Code learning successfully, the receiver only can be controlled by the remote.
4.If not, please re-operate from step 1 to 2.
Method 2:
1.Step 1: Power on the controller after well connection.
2.Step 2: 5 seconds long pressing of the “SET” button (on receiver) until the indicator light lights up, pressing “MODE” (on remote control) 1 time to finish ( “SET” button should be pressed also at the meanwhile), will see the load LEDs flash 3 times by successful operation.
3.Code learning successfully, the receiver only can be controlled by the remote.
4.If not, please re-operate from step 1 to 2.
Clear code operation
Back to factory default, controller can be controlled by any one the same remote control.
Method 1:
1.Step 1: Pressing key “MODE” and hold on, power on the controller, the load LEDs will be 50% brightness white as responding.
2.Step 2: Pressing “B-/S-” 3times in 3 seconds, corresponding to the operation, the LED’s brightness will change as 25%-10%-back to preset level.
3.Step 3: Code learning successfully, the receiver only can be controlled by the remote.
4.If not, please re-operate from step 1 to 2.
Method 2:
1.Step 1: Power on the controller after well connection.
2.Step 2: 5 seconds long pressing of the “SET” button (on receiver) until the indicator light lights up, pressing “B-/S-” (on remote control) 1 time to finish ( “SET” button should be pressed also at the meanwhile), will see the load LEDs flash 3 times by successful operation.
3.Code learning successfully, the receiver only can be controlled by the remote.
4.If not, please re-operate from step 1 to 2.
Typical Applications
Application Circuit 1: RGB

Application Circuit 2: RGBW

Product information for placing order
| Product name | Item number |
| RGB/RGBW 2 in 1 LED controller with wall panel remote control | HX-D7 |
Reviews
There are no reviews yet.